Welcome to Woodworks Made Easy

Practice any art, however well or badly, not to get money and fame, but to find out what's inside you.
--- Kurt Vonnegut

Pictures are meant to be self explanatory, and for visual clarity you may
click on each photo to enlarge. For older projects see Blog Archive. I don't specialize on a particular genre so there is quite a variety of projects for a number of different interests.

Even if you are not a woodworker but you like some or all of the projects, have your local crafts person make them for you from the ideas and photos you see here. For a particular project just click the specific title on the Blog Archive list (right side column below).

For anyone willing to learn or begin to do woodworking for the first time, please read first from the Blog Archive, "How and Where to Begin a Woodworking Hobby.

And it is not for men only. Read my note on "Women in Woodworking" from Blog Archive, April 2010.


click on each photo to enlarge


Tuesday, June 25, 2019

Wooden I-Beam


The Wooden I-Beam

Steel - the most common material used in building or for reinforcing man-made structures is itself a fabricated material; by adding carbon to naturally soft(er) and pliable element that is iron. Once infused with carbon iron is now steel. But the one attribute that cannot be avoided is its weight, specially on "long span" applications. So, to counter the sagging effect of weight to strength ratio over long spans, the I-Beam was invented. The I-Beam allowed for countless structures to be created with less weight and material - from railroad tracks to steel frames for skyscrapers to long-span bridges, even to car chassis, etc.

Timber and wood are also one of the most widely used construction materials and technology also caught up with their development along the path taken for iron. Modern engineered wood begun with the creation of plywood and laminated wood. Today, wide plywood boards laminated with narrow boards along opposite edges make for a very rigid material that resist bending with a lower weight to high strength ratio.

In a much smaller scale, this is my version of the I-Beam made from the most common wooden material - stock lumber from the home center and plywood construction sheets and glue. I think the photos are self-explanatory enough except for a few notes on certain tips.


First, 2 X 4 stock lumber ripped to witdh and cut to length.


Stacked dado blade cut the 1/2 inch channel along the length of the work pieces cut to width.


Narrow strips of 1/2 inch plywood ripped to desired width.


Tip: Sometimes lumber, stripped to narrower widths, might warp or curve. Next two photos show two thicker, more rigid flat lumber used as backer boards from which clamps are anchored during glue up.  When the glue dried the finished I-Beam will have been relatively free of any significant curving or warping.


Had a similarly-dimensioned lumber been used the span will at first be straight and appear stiff, but once weight is added it will over time sag towards the middle.  This I-Beam construction, using only two spans and lighter than solid pieces of the same or even thicker dimensions, will remain straight and rigid. This has potential for other construction applications, such as work benches and heavy duty shelves.


Wednesday, June 12, 2019

Light Through the Prism of a Woodworker

LED lights, strip LED lights in particular, for those familiar with this blog, have become vehicles for how I built my own desk lamps. This is my 4th G version as I discovered another manufacturer of LED strip lighting systems.  Earlier versions I did a few years back are all still operating even from almost nightly use. Still lighting up my two desks, instantly coming on at the flick of a switch, hardly producing heat, always cool to the touch and operating with the barest amount of electricity are four LED desk lamps. 

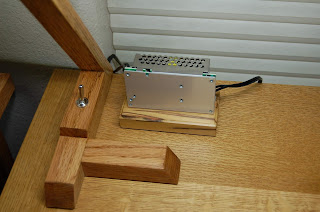
I chose the new system because of the almost retro look of its low-voltage converter, known as the "driver", which I will explain.  Suffice it to say, it has the look of the old vacuum tube amplifiers of the 50's, as you will see. Shown below are two desk lamps built years apart - the one to the right is the latest version. Two others (shown later) are on the other desk.

This is the first project ever, where I actually made an initial full size mock up, from soft cheaper lumber, to see what it would look like because it was difficult to imagine what I had in mind on a piece of drawing paper. Also, as recent projects have been, the piece must use the barest, minimalist amount of material, where no part is without a purpose (none just for aesthetic reasons only).


Manufacturers sell sampler strip lights so customers can see how the lights come out and decide which full length strips to choose for their specific purpose. I purchase the samplers for the purpose of making desk lamps because the 8-inch lengths are about as ideal for desk lamp applications.


Below, the pale looking piece, was the full size mock up - the prototype, if you will.


The next several photos are most of the step by step processes of the actual piece made from white oak. They were put together without using a single piece of hardware. But they must be fastened with glue where the joinery insured maximum structural integrity. Many a project are ruined during the sanding processes or simple handling because of poor joinery.


 The angles for this project made for a slightly complex glue up but rubber bands and strategically placed clamps did the trick.


I actually had to make a jig as extra hands to hold up securely two pieces of wire during soldering. I don't know how I did them in the past but now two extra hands make the task a lot easier.


Heat shrink tubes, also a recent discovery, takes the chore of taping up connections as easy as using a hair dryer or mini torch.

For LED lighting, standard AC power of 110 to 240 volts are converted to anywhere from 5 to 24 volt power sources. Most "drivers, converters, are usually made of closed and compact, directly plugged in devices. This manufacturer, Shoplight Solutions (online contact, Ted Schaefer at ted.schaefer@shoplightsolutions.com) will answer questions via email.
The aluminum material and perforations and screwed in connections make for that retro look of vacuum tube amplifiers I mentioned earlier. To me, it adds to the unique charm of old devices that offered that view of transparency and the good old 50's look. The stained oak and stainless steel toggle switch complete the picture.


The next two photos are of the earlier versions that light up my computer desk in another room.


 These lamps will last forever and cost little in electricity. Next project will be to make task lights at the work shop that will replace fluorescent and incandescent lights.