Our next door neighbor one day three weeks ago texted me if I wanted a 36 inch marble top. They just did a home renovation and the green marble top on a side table will not match the new décor. It was on a massive pedestal which they were keeping for a newer top. She sent a photo taken with her phone. To my amazement, it was actually identical to the marble tiles in our living room.
This heavy marble top is 3/4 inch thick. It was a two person job to carry it. So, she helped me carry what I calculated* to be 75 pounds of solid marble from their home to our garage. Below was where it sat until I could finish the project that I will describe here.

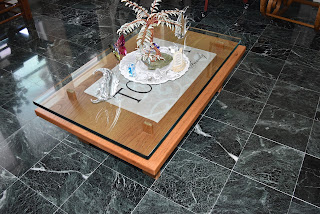
Photo below shows the same green marble on our living room. Serendipity, if I may use that word to describe such a fortuitous coincidence, inspired me to turn it into a coffee table. (By the way, the center piece shown with a glass top was a much earlier project long before the word "re-purpose" was widely used. Back in late 90's or early 00's, I can't recall exactly, a co-worker friend gave me their large dining table glass top. After I picked it up from their home, I went straight to a glass and mirror supply store and had the 3/4 inch glass cut into three pieces. One piece is shown below; the other piece I made into a coffee table for our son; the third piece is still waiting for an inspiration, perchance into another project.

For another look back, about seventeen years ago, one woodworking supply store closed its business. I purchased a long piece of Padauk, at close out price I hasten to say, which I cut in half before storing it. I waited and waited for the right project because clearly I wanted to conserve the valuable piece. Known as Pterocarpus indicus, the species is native to both the African and Asian continents. It is now considered a "threatened" species - already extinct in Vietnam and possibly in Sri Lanka and Peninsular Malaysia.
I do not know where this particular piece that I have came from.
By the way, in an earlier blog, I did use a bit of the Padauk to make an old world bow saw, or extra-large coping saw. I believed the strength of this hardwood was best to withstand the stresses that this particular design has on the frame.
Okay, now to the project. I cannot emphasize enough how much I value this material. So, I went for the minimalist design - as little material as possible, yet structurally strong to support the heavy top. My college degree is in mechanical engineering, so I had to dabble in civil engineering if I were to keep the use of material to a minimum without jeopardizing its ability to carry the heavy load and not have to use any fastener between the legs/pedestal and the table.
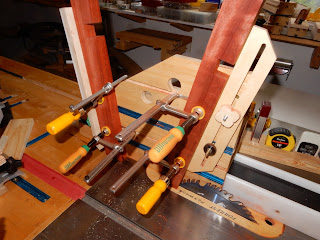
All four legs will spread outwardly (splayed) from the vertical by 10 degrees for stability. Each leg is therefore mitered to that angle.
A trial assembly before the joinery is cut, to see how it looks relative to the table top.
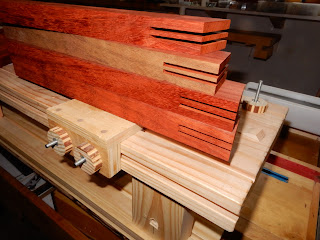
A jig I made a while back made easy work of cutting the spline joinery on the table saw. Note the center notches had already been cut.


The bad news was that for two weeks the project was delayed because the supplier I ordered the swivel casters from messed up the delivery. I cannot make final assembly because I needed to drill the holes for the threaded insert first before glue up.
Meanwhile, just to show how critical it is to have an overhead air cleaner in an enclosed workshop, the red dust from the Padauk shows up clearly on the inlet filter. It is amazing how much dust is cleared from the air each time I use the table saw and sander. HOWEVER, IT SHOULD STILL BE MANDATORY THAT ONE SHOULD ALWAYS WEAR A DUST MASK WHILE DOING ANY WOODWORKING.
At last the casters came.
The caster assembly needed a threaded insert drilled into the bottom end of each of the bottom legs. The tool that makes possible the ability to drill horizontally is a story in itself, but it will have to wait in perhaps another blog later on.
Each leg had to be skewed 10 degrees in order for the wheels to be precisely vertically upright.
Now that the threaded inserts had been installed, glue up followed, except at the center cross-connection. It will have to wait for last.
I'm confident the glue will hold at the joint but for insurance I inserted a half inch dowel as a pin.
With the drill spindle (chuck) removed, replaced with a sanding disc, the tool made quick work of rounding off the elbow.
Note: the two pieces are not glued up yet. Final sanding.
Final glue up, joining the two pieces at the center intersection. Note that the cross section gives maximum contact and support to the marble top from center out, thus allowing the downward stresses for both the marble and the legs to be evenly distributed.
Two coats of Tung oil.
Now, positioning the table top to be exactly centered with the legs, I temporarily attached four "story sticks" whose tips were exactly 36 inches apart, and exactly 18 inches from center. I had another person help me position it by making sure the end of each stick is at the circumferential edge of the top. There was no other way we can see the position of the pedestal without those sticks. Note the black strips. They are neoprene rubber pads that not only provide cushion, they actually grip and hold in place the table top. With its heavy weight evenly supported, it is not going anywhere, even with no fastening hardware.
The wheels run smoothly and silently - quieter than a mouse's whisper - and makes easy work of moving the table around, yet immoveable once locked in place.
Marble was created during earth's early history from sedimentary carbonate rocks, like limestone. Intense pressure and heat metamorphosed the limestone into interlocking carbonate crystals. White marble comes from the typically white limestone. Different shades and color come from a variety of "impurities" that swirled in with the limestone.
"Green coloration is often due to serpentine resulting from originally magnesium-rich limestone or dolomite with silica impurities. These various impurities have been mobilized and recrystallized by the intense pressure and heat of the metamorphism".
This will be a nice corner for coffee and a book while sitting on a rocking chair. That is a hallmark of retirement. But wait, there are a few more projects waiting!
* In case you missed it, the asterisk in the second paragraph referred to how I calculated the weight of the table top. 36 inches in diameter and .75 inch thick meant the table top has a volume of 763.4 cubic inches of solid marble. The average density of this type of marble is 169.24 pounds per cubic foot (1728 cubic inches). weight of the table, therefore, is : 763.4/1728 X 169.24.
I have it in the best authority that the table top weighs almost 75 pounds.

