Welcome to Woodworks Made Easy

Practice any art, however well or badly, not to get money and fame, but to find out what's inside you.
--- Kurt Vonnegut

Pictures are meant to be self explanatory, and for visual clarity you may
click on each photo to enlarge. For older projects see Blog Archive. I don't specialize on a particular genre so there is quite a variety of projects for a number of different interests.

Even if you are not a woodworker but you like some or all of the projects, have your local crafts person make them for you from the ideas and photos you see here. For a particular project just click the specific title on the Blog Archive list (right side column below).

For anyone willing to learn or begin to do woodworking for the first time, please read first from the Blog Archive, "How and Where to Begin a Woodworking Hobby.

And it is not for men only. Read my note on "Women in Woodworking" from Blog Archive, April 2010.


click on each photo to enlarge


Saturday, December 26, 2015

A Japanese Tool Box


The Japanese tool box is most notably known for its cleverly designed distinctive lid (top cover) which is explained below.  I read somewhere that this design had been around for at least two hundred years, if not longer. Most boxes of this type - there are as many variations as there are craftsmen who make them - are typically longer, perhaps twice as long as the one I made here.  Those boxes are usually made to carry tools to a job site.  I only needed one to carry tools from the work shop to inside or around the house.  For the construction detail please see preceding blog, "Anatomy of a Japanese Tool Box"

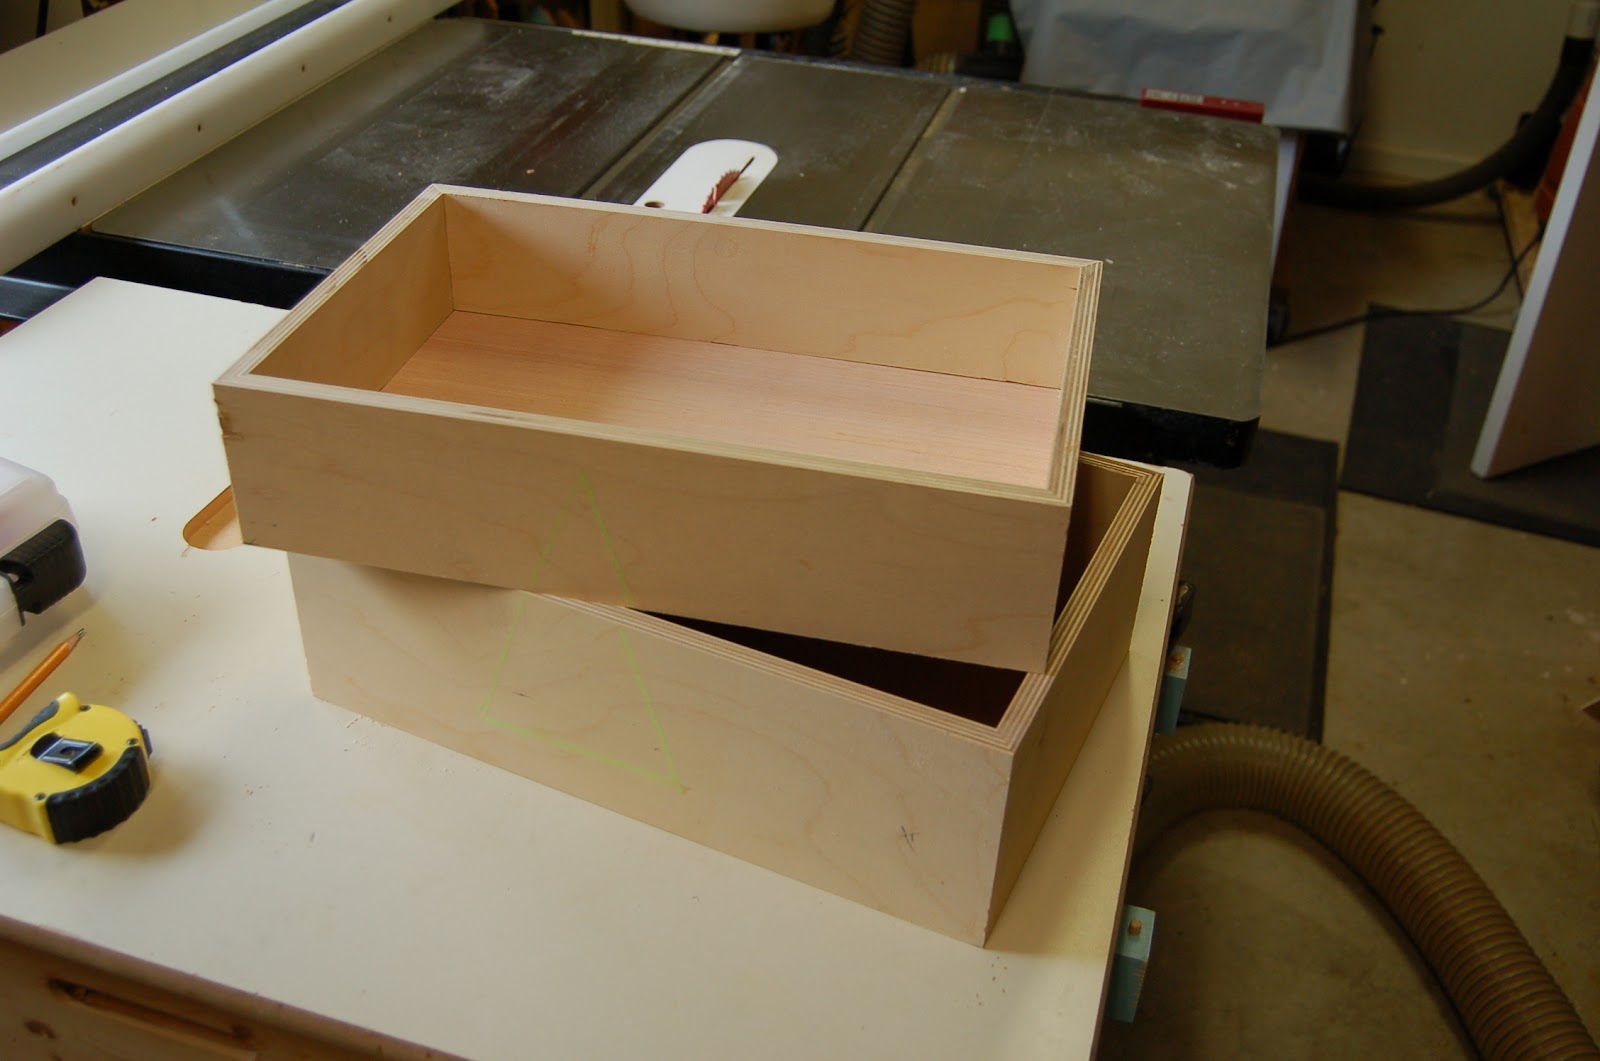
Unlike most of the designs, I made mine a 2-compartment tool box. The seam is barely discernible because the two compartments were saw-cut from a single box (there is a tip on its construction from the previous blog).  As it turned out, the only feature I adhered to was the wedge locking system - which is what makes it a Japanese Tool Box.

Secret to the lid locking system: Slide one end towards the right and under the wide board; then slide it back towards the left under the narrower board.  The lid is now completely over the opening.  The next photo shows the wedge lock inserted in between the channel created as the lid is moved to the left.

 The second variation is in how I constructed the wedge.  Typically, it is a flat tapered wedge.  I cut the tapered wedge with the saw blade tilted slightly so there is no chance for it to pop out, once closed. 

The lid is positively shut and will  open only by retracting the wedge completely out of the channel.


Most household chores, if there is any drilling required, will likely need only the "lady" Festool drill.  I know the German manufacturer will not want to call it a "lady" cordless drill because they believe it has more than enough power to do the job that some bigger drills may be hard pressed to do.  

But the box will accommodate two drills in one compartment and hand tools in the other (top compartment)

Extra batteries included

When on a ladder, a smaller/lighter cordless drill is safer to use so whenever possible it has to be the tool of choice.

Anatomy of a Japanese Tool Box

I used half inch Baltic plywood for the box, 1/8 inch plywood for the middle and bottom compartments; reclaimed mahogany for the lid, trim and handle.  


This is actually leftover plywood from a previous project.

A saw sled is a safe and accurate way to cut miter on a wide work piece

A stop block (shown at the lower corner of the board insures repeatable cuts.

Before glue up I cut grooves for the middle and bottom compartments


Took three band clamps to tighten up the joints.

Tip:For accurate and safe all-around cut of the box into two separate pieces, tape the cut portion as shown but use a double sided tape on the rectangular scrap flat wood secured by the blue tape, thus stabilizing the soon to be separated pieces. The two pieces will separate without binding the saw blade.


The reclaimed mahogany needed to be planed (to remove the stained surfaces) and flattened.

The lid required three pieces of the mahogany (glued edge-to-edge)

Clean up and flatten the surface.

The mitered corners were re-enforced with angular mahogany for added strength and stability.


The corner trim at the bottom compartment protrudes about 1/8 inch higher while the trim on the top compartment is shorter by 1/8 inch.  The top compartment would then seat properly and securely over the lower compartment, making for a seamless joint.


The wedge "key" is usually tapered flat.  I did a compound cut by making the taper with the saw blade tilted a little bit.  This insures that the wedge will not pop out.

I used red cedar to plug the screw holes.


I laminated two pieces of mahogany for the handle.  A laminated piece is a lot more rigid and stronger than one whole piece of the same dimension.


The handles are meant to be removable. The handle pivots around the large pin (dowel) but the tool box will rotate when picked up; the second pin with the metal ring prevents by fixing the handle to its vertical position.  It is removed to swing the handle to the side.


The tool box will accommodate - not all at one time - but a few combinations of the tools shown above.  This tool box is primarily to ferry certain tools from the work shop to inside the house for certain chores.


Monday, October 12, 2015

Vintage Ice Cream Scoop Restoration

I wasn't sure about how to restore a vintage ice cream scoop for a friend. First and second photos are indicative of the age of this scoop.  I had to do something about the hole at the end of the wooden handle and it is obvious that the ferrule had come loose and the stem of the aluminum scoop was even looser.  This ice cream scoop is definitely worth restoring because the cast aluminum is in very good shape and actually thicker than most vintage scoops - its rack and pinion is in excellent condition.  It will scoop ice cream as it had when brand new out of the box, however many decades ago.


I cut the portion of the handle that had the hole in it.

Pau ferro is a hardwood found only in Brazil and Bolivia; translated from Portuguese, it means iron wood - and it lives up to the name.  It is expensive so one must use it sparingly, as finger boards in guitars, for example.  I've used it once before as a corner accent for one of the platform  beds I made, shown in this photo.


Here is a piece of pau ferro.  I drilled holes at both pieces for a more robust joint.

Add caption

After a lot of hand filing and hand sanding the pau ferro tip on the handle had taken the half - egg shape. I  used 2-part epoxy/resin mixed with fine sanding dust to add thickness to the ferrule stem and in the hole that received the scoop's stem for a tighter joint.

There are many vintage ice cream scoops out there but the little detail at the end of the handle makes this one of a kind. 

Hopefully this will last for at least 25, if not for another hundred years.

Wednesday, September 9, 2015

Rescued Hand Tools Part II

I will not claim the same nobility as those who rescue animals but because of my love for woodworking I do my share of rescuing old hand tools from neglect and rust.  I avoid power tools because those would be beyond my abilities.  But there is something about hand tools.  They can actually be restored back to where they will perform as they were intended when brand new. I cannot say the same for power tools.  The most common place I go to are the flea markets.  They are like the nursing homes of old tools, or worst, they are the potter's field for these tools if not found and restored.  Remember that the iron from whence the steel came to make these tools from is at least 4-5 billion years old - forged originally in the belly of an exploding star or  supernova even. 


Most recently on a trip to Boston I went back to the same place where they have an open market every summer.  99% of the stuff there and in most of these places like it, the pickings are not very good.  But once in a while, if one is patient, there are nuggets that can be had for very little money.  That is part of the thrill.  Except for the cabinet scraper which priced at $2.00, everything else was for fifty cents.


This cabinet scraper was a major find. The seller wanted $2.00 and I was ashamed to even haggle, which I did  because that's what you do at the flea market.  The seller did not budge so I bought it.  I paid for one four years ago for $40.00 - the modern version of it - made in England while this one is U.S. made.  It's a Stanley 80 but there is a subtle difference as you shall see.


This trowel, $.50, has a wooden handle, its main attraction even though the metal was rusted.  But I knew I can restore it.


These two pliers, also fifty cents each, did not seem like much.  The big pliers wouldn't even open - rusted shut.


The wooden handle on this one had the same attraction to me.


Brushes, sand paper and mineral spirits and the joy of working with these gems are all one need.


A rust reformer for the metal part after brushing off and sanding the lose rust did wonders to the metal.


A primer over the metal does the trick of keeping anymore oxidation from taking hold.


A diamond sharpener is a must to flatten the sole of the scraper


The previous owner did not flatten it and was likely the reason he or she did not get good results from this tool.


Here is the tale of two knobs.  The new version (made in England) has a different, more modern knurled knobs for holding the blade.  Compare with the older version - note the knobs have holes in them.  Also note that the old one had two holes by its handle.


This is what I mean.  The tool performs as it was intended.  Excellent for evening out glue joints, leveling the work piece flat.


Restored and ready for use, except for the one little hammer head that is still looking for a handle - a project by itself for later.


Over the years, these are some of the rescued tools and very much capable of performing what they were designed for.