Welcome to Woodworks Made Easy

Practice any art, however well or badly, not to get money and fame, but to find out what's inside you.
--- Kurt Vonnegut

Pictures are meant to be self explanatory, and for visual clarity you may
click on each photo to enlarge. For older projects see Blog Archive. I don't specialize on a particular genre so there is quite a variety of projects for a number of different interests.

Even if you are not a woodworker but you like some or all of the projects, have your local crafts person make them for you from the ideas and photos you see here. For a particular project just click the specific title on the Blog Archive list (right side column below).

For anyone willing to learn or begin to do woodworking for the first time, please read first from the Blog Archive, "How and Where to Begin a Woodworking Hobby.

And it is not for men only. Read my note on "Women in Woodworking" from Blog Archive, April 2010.


click on each photo to enlarge


Saturday, February 23, 2019

Hole-in-One

Every now and then in woodworking, like anywhere else where one practices a hobby or profession, there is a tool - purchased or acquired a while back in case it is needed - that finally is put to use.  Router bits are a case in point. A long time ago I thought it was worth investing in a rabbeting bit set for a variety of depth of cuts depending on the size of the ball bearing on its tip. It is one of those  things that though seldom used it is worth its price once the need arises. 

Here though is a task that may surprise anyone who may run into enlarging an existing hole. It is almost an impossibility to pull off with precision and accuracy to achieve the proper diameter of the new bigger hole.


This bit will only cut to the depth that the bearing will allow it. With the bearing as guide it will run along the inside diameter of the existing hole while the bit cuts a rabbet on half the thickness of the board.


Shown above with the board turned upside down after the cut where a larger diameter had been cut precisely.


Then comes along a flush cutting bit, where the diameter of the bearing is exactly the same as the cutting bit. The bearing will now run along the wider hole, thus allowing for the bit to cut into the remaining rim of the smaller hole


The whole operation is best done on the router table (another reason why a router table is an essential part of the work shop). The whole board (work piece) is much too large if the router fence remained in place. The fence can be easily removed by taking out just two locking knobs.


The photo below was taken while the bit was spinning to show the enlarging new diameter hole. Holes can be enlarged almost ad infinitum by simply repeating the process over and over until the desired larger hole is achieved.


What was all the fuss about? I needed to relocate one hole (see where it was finally covered with a square 1/4 inch plywood) from an existing location to the center of the top board shown below. The smaller hole was the limit of my spindle drill cutting bit.


This is my 5th generation design of a saw dust interceptor. This intermediate element of the dust collection system allows for much of the saw dust and other waste debris to be caught by the cylinder in between the tool and the dust collector. The aim is for air, mostly air anyhow, to go all the way to the impeller and filter of the collector shown below.

NOT SHOWN  INSIDE AND BELOW THE TOP IS MY DESIGN THAT ALLOWS FOR THE DUST AND OTHER PARTICLES TO SETTLE DOWN WHILE DUST-FREE AIR IS DRAWN TO THE OUTLET HOSE INTO THE DUST COLLECTOR.


Fine dust and coarse debris were trapped at the bottom


So far, I'd say 99 per cent of dust and debris were intercepted. Need to make certain over a longer period of use, but so far so great! This could be something ⦽💡

So far, the dust collector - filter and receptacle looked empty, free of dust!


Monday, December 3, 2018

Table Refinishing 101


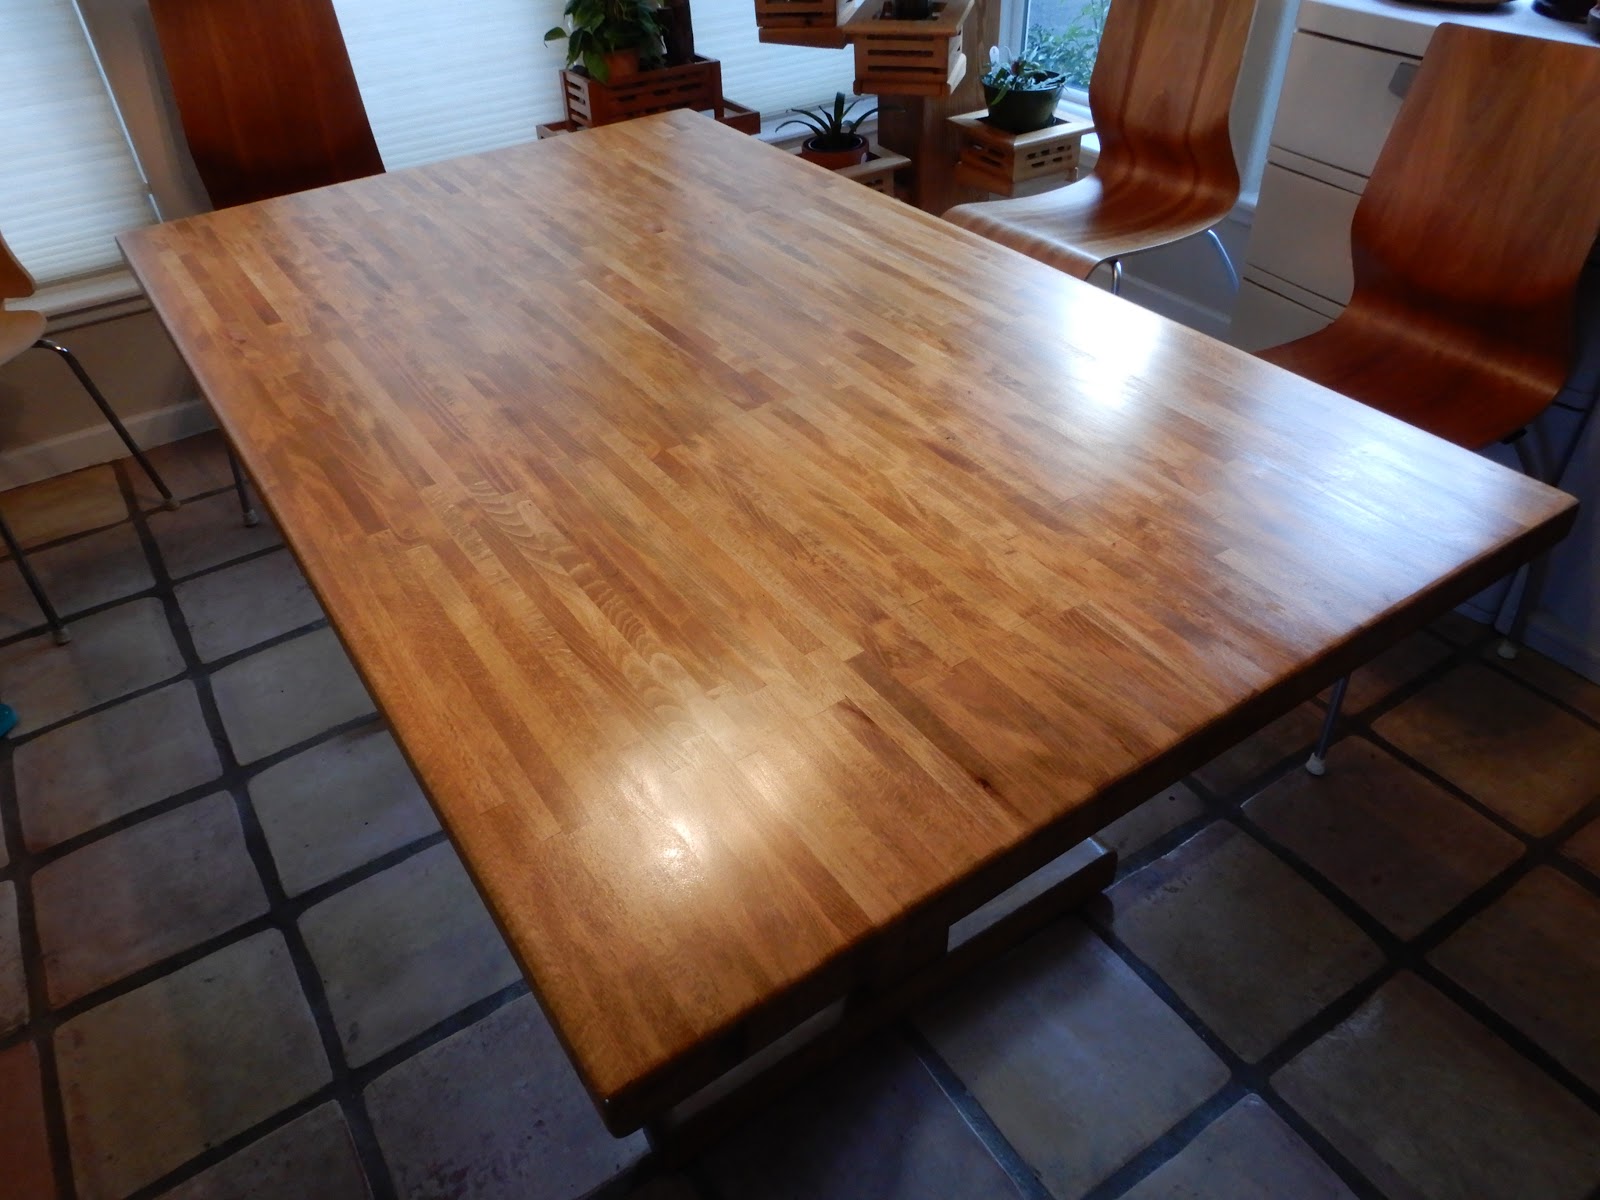
Solid wood furniture can last for generations. However, along the way, assuming no structural or surface damage, its finish will need to be renewed or redone and that is all that is needed to bring it back to its original splendor . It does not need special tools and one hour is all it will take on a furniture like the breakfast table. This table is the most frequently used in our household and sometimes even as a work bench. So, every so often it needs a makeover. We bought this in 1981 as raw furniture (unfinished - rough, unstained, unvarnished) because that was all we can afford of a well constructed piece - a butcher block top. That purchase was pivotal in getting me into woodworking. This is the fourth time its finish is redone. 

Step 1. Remove old polyurethane finish. I opted for a hand card scraper to do the chore instead of sand paper or a power orbital sander. Actually I highly recommend a card scraper on flat surfaces like a table. It is dustless, noiseless and a good light workout. And it is more an art form than using brute force. There is something Zen-like about the swishing sound as it creates a very smooth, even flat surface without the swirl marks produced during sanding minus all the dust flying around the work area. Later you will see how to hone a card scraper.

Not comfortable using the scraper, use sand paper by all means.


A hand card scraper is an edged metal held with both hands, two thumbs pressing two corners against all fingers bending it slightly convex towards the forward direction and slanting it between 30 to 45 degrees leaning forward.
Scraped finish stays right where you end the motion of the scraper.

 I am fortunate to own a very quiet portable HEPA vacuum cleaner but one may simply brush/sweep and wipe off the waste with a moist cloth, and it will be just as effective.


Step 2. Apply new finish

For a table like this I favor tung oil. The oil is extracted from pressing the seeds from nuts of the tung tree, predominantly growing in China. It has the following advantages that  beginners can get into using it with little experience.

a. It is safe and non-toxic that it can even be rubbed with your bare hands. Some crafts people actually like to rub the oil with the heel of their palms because the heat from friction supposedly help the application.
b. The oil penetrates into the grain of the wood, unlike, for example, shellac or polyurethane that coats the surface, creating a shell rather than penetrating. Rubbing application is less critical than brushing or spraying that demands an even coat. Rubbing can be done over and over the same area wiping off excess oil as needed.
c. The oil "shows off" the wood grain in its natural luster while resisting water marks and other liquid, including all kinds of beverages.

Only disadvantage is that total drying time takes overnight, preferably 24 hours after the last application.


Tung oil is a very "forgiving" finish to apply. 


Surface ready for the finishing


Tung oil has that ability to show rather than obscure rich grain of the butcher block table top

Typical use of a card scraper is shown here on bare wood, removing very thin shavings at a time to flatten and smooth a flat surface.
Honing the card scraper is tricky business and experienced wood workers do it unerringly quickly. Burnishing is the easy part. Squaring the edges is difficult to achieve consistently. I made a jig shown below that eliminates the guess work. The scraper is sandwiched between two flat boards to insure a perfect perpendicular orientation to the honing tools - diamond sharpener and steel file.  


Monday, November 26, 2018

The Evolution of the Screw Driver


Early in our history the three most transformational inventions are widely accepted as the wheel, the lever and the inclined plane. While the wheel is  more popularly well known, the inclined plane is not so much. It lacked the recognition or a good publicist. Even less so is the fact that the screw is actually a much more useful version of the inclined plane. So are propellers and electric fans, the cork screw, rack and pinion gear system, and of course the spiral lanes in multi-level car parks, etc.


Why the nerd talk? Well, it is to recognize the contribution of the inclined plane and its derivative - the humble screw and the driver that makes a lot of wood working projects possible. Wood is put together using just three major means - glue, nail and screws (including knock-down furniture). I favor glue but if I must use any hardware at all, it will have to be screws or threaded bolts. 


Understanding why it works is understanding the science of the inclined plane.


Below is the anatomy of the screw. The thread of a screw, unwound, is an inclined plane.  I made the  illustration below to show science behind the mechanical advantage that the screw offers. 


The early screws were flat heads with single notches or slots.  Flat head screw drivers had to concurrently come along, just as hammers were to nails.


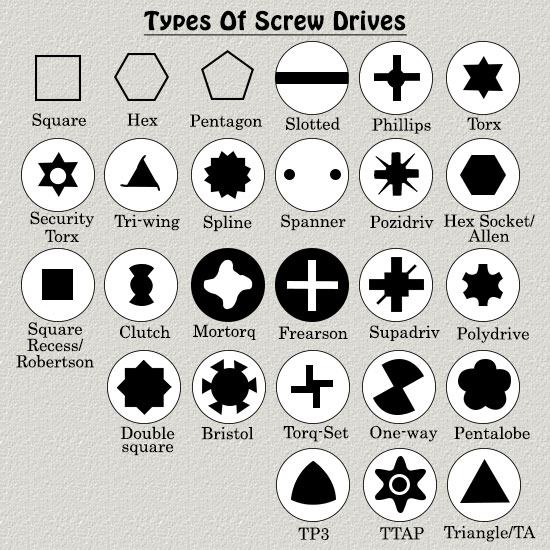
Flat heads ruled for a very long time, like the dinosaurs did. And dinosaurs they've become. Then came the cross-slotted Philips screws and the Philips screw drivers. Today ...

Image result for different screw types


More and more we see specialty screws that require dedicated screw driver heads. Manufacturers therefore had to come up with a more practical solution to deal with the varieties of screw heads with a single handle with interchangeable driver bits.

This German made handle is one durable, hefty, well designed model that has a ratcheting mechanism. With a turn it will drive, and with a reverse turn it will extract - both with ratcheting action or with another turn it can be set to non-ratcheting rigid configuration. The drive head will accept all universal bits.

And the handle can bend as shown for more leverage.

And furthermore, a rod inserted through a hole increases the torque power even more.

And speaking of torque power, the portable electric drill/driver came along. Then came a variety of quick connect/disconnect bit holders, stemmed to fit standard chucks on all drill/drivers. See two clever examples below.   

Then came another innovations from another German tool maker. First, a removable quick connect/disconnect chuck, and a special (also quick connect/disconnect) bit holder called the Centrotec.


In all of the above, including many varieties of bit holders, there were the inherent wobbling or wiggling of the bits when installed. Some were better than others.

Then came along another innovation in quick connect/disconnect designs from the maker of Centrotec technology. See description below. The new handle that is reasonably priced at $24 is a cut above all others. The bad news is that it will only take Centrotec bits.

But, with an adapter, universal bits of all varieties can be used. However, the adapter can cost another $26-29. However, it is worth an investment if you already have a bunch of universal bits. Then you will have a wobble-free hand held screw driver with an almost infinite choices of bits, including sockets for driving small bolts.


By the way, a shorter configuration means more comfort and "sure-footed" driver for added confidence in driving screws.


Here is the dream screw driver set to last a life time.


Tuesday, October 16, 2018

Holder for Extra Roll of TP

Coming up with this project would seem like I had ran out of ideas on what next to do. Well, I was intrigued by one little item at a hotel where we stayed. In the bathroom was a holder for extra toilet paper. Typically we'd find this extra item hidden in an under-sink cabinet or on top of the commode itself. This one was on the wall near where the regular roll was on a standard holder. I wish I had taken a photo. As it turned out there are dozens of these holders sold commercially at home furnishing centers and online.

I decided to make four of them for the number of bathrooms in the home. It must have the minimum amount of material possible - staying with the minimalist aim for completing the projects. Commercially available ones are either molded metal or hard plastic which easily achieves the minimum material limit. With wood, the challenge is in the joinery, which is really the main reason for this project - exploring new joinery methods for a simple project but it must be effective and strong.


A tapered pilot hole for the vertical stem is a must so the rod will not split or crack


Well, this project with the special joinery will be on file for future ones.