Welcome to Woodworks Made Easy

Practice any art, however well or badly, not to get money and fame, but to find out what's inside you.
--- Kurt Vonnegut

Pictures are meant to be self explanatory, and for visual clarity you may
click on each photo to enlarge. For older projects see Blog Archive. I don't specialize on a particular genre so there is quite a variety of projects for a number of different interests.

Even if you are not a woodworker but you like some or all of the projects, have your local crafts person make them for you from the ideas and photos you see here. For a particular project just click the specific title on the Blog Archive list (right side column below).

For anyone willing to learn or begin to do woodworking for the first time, please read first from the Blog Archive, "How and Where to Begin a Woodworking Hobby.

And it is not for men only. Read my note on "Women in Woodworking" from Blog Archive, April 2010.


click on each photo to enlarge


Wednesday, August 17, 2016

Bedroom (Torsion box) Bench

My wife requested for this project with some requirements. It is quite obvious by now that the torsion box method of construction for making very light yet structurally rigid projects is my favorite, as earlier blogs on the subject indicate that very clearly.  This time though I would like to show more details and prove once more how a 60-inch long, 18 inch wide bench can be made so rigid and strong, yet so lightweight.  First key to this project is constructing the internal framework - an inner interlocking structure made with regular yellow or white pine soft wood.

                                    
The 2-inch wide pieces that make up the grid were constructed so precisely that no glue or any other fastener were needed to hold the parts in place. Not absolutely necessary to be effective but I want to demonstrate that a dial gauge caliper will allow precise cuts using the stacked dado blades on the table saw with trial cuts (shown above)  be first made to insure a good fit.  By the way, a dial gauge caliper that is more known as a machinist's tool is an invaluable woodworking tool such as in depth and height gauging, inside diameter measurements, etc.


Taking the time to set up the cutting order and use of stop blocks on the miter gauge pays off in a precisely accurate assembly of the grid.


A little tap with a mallet was all that was needed to put the grid together tightly and rigidly.


18 gauge pin nails and glue were used to fasten the side and end pieces, thus closing the "lattice".


To avoid sharp corners I made sure that it is done during the framing process.
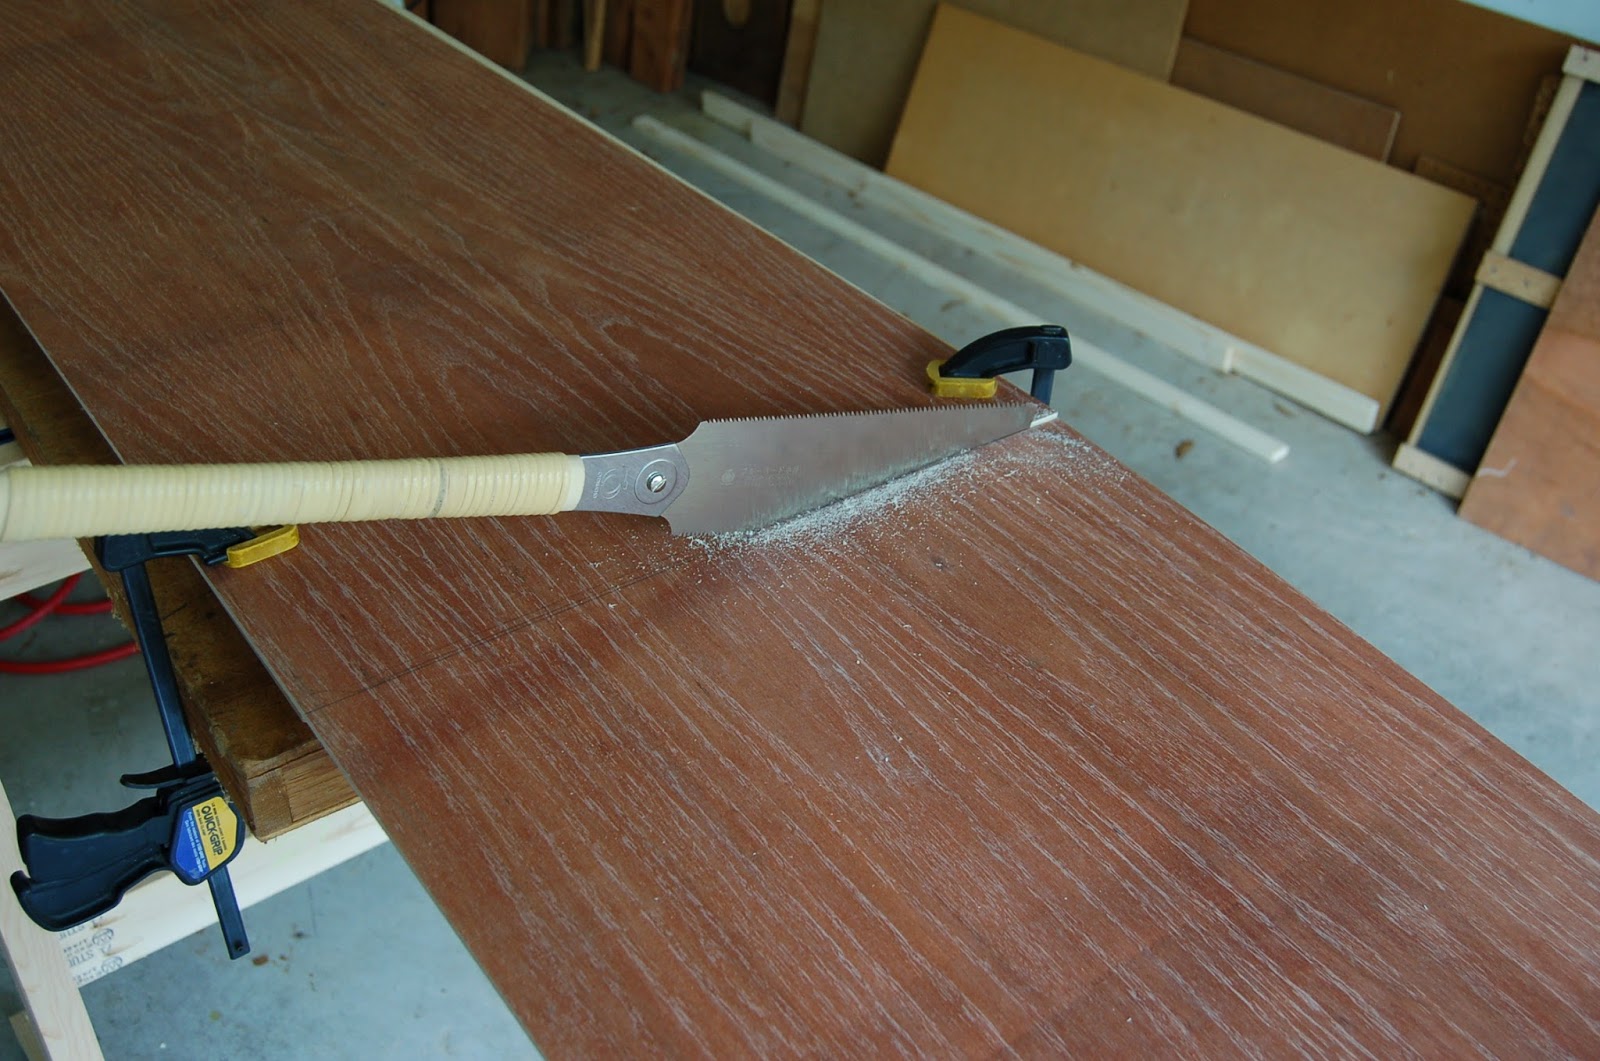

The 1/4 inch oak plywood skin is cut with a Japanese hand saw.  No need to be really precise with the cut at this point except to make sure it is slightly over-sized over the frame.  Edge routing will later trim it flush.


 The extra-thick blocks shown will be drilled for the large dowels that will connect the legs to the bottom of the bench. Make sure to mark the locations because drilling the holes will come after the plywood skin has covered the grid.


A little flattening and smoothing of the frames edges will insure good adhesion of the plywood skin when glued.


The side and end edges of the frame will be clad with 1/4 inch thick pieces of solid oak and walnut .


45-degree cuts will hide the seam between the oak and walnut.

23-gauge pin nails were used for the rest of the structure - fastening the plywood skin to the frame and the solid oak and walnut to hide the sides.  A good amount of glue was used each time before nailing them all together.

Here is another way to highlight the utility of the Krenov sawhorse.  Check past blog on the construction of this versatile sawhorse. 

The 23 gauge pin nails will barely show, especially once the project is finished.
 This finishes the bench seat.  Next step is to construct the pair of legs that will support it. 


A full size sketch of the leg is laid out on a board as shown below. 


I used lap joinery, which is simple but must be cut precisely. The full size drawing helped in laying out the parts and in cutting the joinery. A dial depth gauge (shown below) is another precision tool that takes away the guess work or trial and error when cutting the joinery on the table saw. 

I do not do this everyday so I'd use every precision marking tool (shown below) I have to make the cuts precisely.  It does save time and naturally saves material when you can do it right the first time, every time.

All the effort and time (going slow and making sure the markings are precise) makes assembly a breeze.


Using 5/8 inch dowels as "anchor bolts" to fasten the legs to the top will require precision drilling of the holes on both sides - on top of the leg's rail and bottom of the bench seat. A great solution is to make a jig where I drilled three holes.  These properly spaced holes will serve as guides to locate the holes on the leg and the bench accurately.  The "channel" on the jig with the help of a clamp eliminates movement that insures accurate location during the drilling process. 


The same jig is then used to drill the holes on the bench.

One requirement from my wife is that even her can easily move this bench effortlessly, hence the minimal use of material without compromising strength.  The bench top dimension is 60 X 18 inches.

The dowel pins are glued first to the legs.  Once dry and fully fixed, all three may not go in completely or are going to be very tight, so a slight sanding of one or two of them will insure a snug fit. (make sure not to force them in; so a little patience in fine tuning the fit will do the job).

Sufficient amount of glue and 3-1/2 inch wood screws and making sure they are perfectly perpendicular (90 deg) to the bottom will completely fasten the legs.


One coat of stain and three coats of rub-on polyurethane were applied.

Note an earlier 48-inch bench in the background.  This 60-inch bench (or 1.523 meters to my European readers) tipped the weighing scale at a mere 17 pounds (or just 7.7 kilos); it is lighter than most carry-on luggage.  One may carry this literally tucked in between one arm and one side.

The bench will seat two-three people


Now for an explanation as to why the legs were configured this way. First, the back edge needed to be flush to the bed mattress.  The bed's platform would have been in the way. Second, my wife also wanted to round off the corner of the platform.  I cannot just cut the corners off because the platform was also constructed as a torsion box (check my earlier blog on its construction) so the inner skeleton will be compromised. So, the next project will deal with that and it is likely that the best solution is to extend the width by about two inches, hence the allowance for a seemingly wide gap.

Monday, April 18, 2016

Mantle Plant Light Fixture

The previous owners of the house we live in now had the idea of creating an indoor planting area in a section of the foyer next to the front door and against the wall. It had to have cost extra to have that space through the foundation because the soil in it is all the way through the ground underneath.  Well, the garden did not work because of one little detail they didn't consider - light. Or, the idea perhaps was that there was going to be enough filtered light to come through the glass next to the door.  Anyhow, when we got the house a few plants that were in the soil were barely alive.

I decided to provide artificial lighting to the area by building a mantle up against the wall and install the light underneath it.  This was the least disruptive to the wall area.  There is a fireplace mantle in another area of the house that I wanted to copy, partly because from a certain viewing angle both mantles can be seen simultaneously. 

This is the model of the mantle design I made for the wall by the foyer.

The design called for a 1-1/2 inch half round for the edge as shown in the fireplace mantle. I purchased closet rods and split them lengthwise in half for the half round.

The challenge, of course, was how to split it at the table saw safely and accurately. I sandwiched the rod between two 2 X 4 lumber and drove a couple of screws to stabilize the rod during the ripping operation. It worked perfectly.

The next challenge was how to cut the miters on the half round.  This and the next photo shows how.


The finished mantle before painting.

I don't know how the fireplace mantle was attached to the bricks but I knew how this one was going to be secured against the wall.  The French cleat method is, in my opinion, the most ideal because this is a heavy structure for one person to install accurately and safely.

The French cleat allows for the easiest method of accurately placing and leveling a straight lighter rail against the wall.

I ran the necessary wiring for power from the other side of the wall where there was an outlet in the next room. As you can see there is no visible wire because the small hole was right behind the junction box. The junction box is where the timer will be plugged in.

I actually did this project a while back but since I was going to change the ballast for the florescent lamp when I decide to take the photos.

The unpainted portion shown in the foreground is the mating cleat to the one already attached to the wall.

For plants to grow the fixture needs a plant and aquarium light bulb.


Timer
This is quite heavy but the French cleat method makes it easy because the mantle will just slide into place from slightly up against the wall into the wall cleat like a wedge.


Tuesday, January 19, 2016

TV Cabinet Enclosure and Pocket Hole Joinery

Joinery is everything in woodworking and there are many varied ways to do it.  In cabinet making the speediest method is using pocket hole joinery.  Many purist woodworkers are likely not to use it but this is "Woodworking made easy" and as you shall see it can be fine woodworking when they're well hidden; and not an unpleasant sight even when exposed, as with the installation of the rear surround speakers up on the ceiling.

The original "TV stand" in the living area just had a table cabinet to support a television. The goal was to construct a cabinet around a flat TV and no wires should be visible in front.

The table cabinet had two solid doors so the first order of business was (1) cut out the left door and install a smoked glass where the receiver and other electronics that work on infrared frequency controls can receive the signal from the remote; (2) cut out a hole on the right door to expose the front of the sub woofer speaker.  A hand held jig saw did all the cutting.

The frame of the enclosure was constructed with stock white pine and put together with pocket holes (you may review previous blog on "Why pocket hole joinery".  I painted it to match the original table cabinet.

The right side is against a brick wall so it was left open. The left side has an access door to the back of the TV and to all the wiring behind.


An electronic fan was installed to evacuate heat generated by all the equipment below through holes drilled on the table top.
Indeed these do generate some heat.

The open top allows for heat from the TV to dissipate easily.

To hide the wires from showing up front I constructed narrow wall as shown and painted it with matching color of the cabinet and enclosure.

The wall in effect hides from the front view any wires behind the TV

And, no wires in front indeed. (Right, left and center speakers are at the enclosure itself.  The propagation of the sound from ten speaker sources (which includes the sub woofer) are managed by an on board computer that processes how much sound each speaker produces for five different listening locations, set up initially by five microphone placements (chosen typically by the seat locations where people sit). 


The two locations of the surround speakers were located at the back ceiling of the listening area and note the use of pocket holes to install the "post".

First, I installed a base plate (plywood) with a hole just enough for the speaker wires to go through from the ceiling. I constructed the post separately with pre-drilled four pocket holes. They were painted before installation.