Welcome to Woodworks Made Easy

Practice any art, however well or badly, not to get money and fame, but to find out what's inside you.
--- Kurt Vonnegut

Pictures are meant to be self explanatory, and for visual clarity you may
click on each photo to enlarge. For older projects see Blog Archive. I don't specialize on a particular genre so there is quite a variety of projects for a number of different interests.

Even if you are not a woodworker but you like some or all of the projects, have your local crafts person make them for you from the ideas and photos you see here. For a particular project just click the specific title on the Blog Archive list (right side column below).

For anyone willing to learn or begin to do woodworking for the first time, please read first from the Blog Archive, "How and Where to Begin a Woodworking Hobby.

And it is not for men only. Read my note on "Women in Woodworking" from Blog Archive, April 2010.


click on each photo to enlarge


Tuesday, September 20, 2016

Scrap Wood Projects 2


The scrap heap can be a good resource for small projects so I keep some, perhaps as much as the same amount I throw away. Hard wood cutoffs, some even exotic ones, ought to be kept - most of them anyway - because there will always be small projects to do. However, there is also a place for softer woods to serve as test pieces and/or as support interior parts (wedges, braces, etc.).


These small stands are an attractive addition to non-draining glass planters. I am a proponent of indoor plants and I will discuss that in more details at the end of this blog.

 I picked a few oak cut offs, shown above.


Gluing up a few pieces will provide a wide enough work piece to make the circular base.

No matter how small the project, scrap wood or not, it should be done with the same care, patience and the utmost amount of diligence. If one is going to spend the time to do a project, one should do it like it is worth doing; otherwise, it will just be a waste of time.


For a strong joinery, I needed to make three slots around the perimeter of the circle that will match the slots in each of the leg supports. ALWAYS use clamps when working small work pieces on the table saw for accuracy and more importantly for safety.

 It is always a good idea to dry fit the pieces before final shaping.
 A quick pass with a small round over bit at the router table eases the edges of the parts.

 Band clamps are ideal for circular joinery.  Glue was applied to both mating pieces before clamping.  I used golden oak stain, and after a 24-hour drying-up period I followed it with two coats of rub-on polyurethane (below).


Now, for my passionate endorsement of the importance of indoor plants.  First of all, indoor plants do not need to take up a lot of space (shown above is a footprint of 21 X 26 inches); unlike indoor pets they stay in one place where their movements are barely perceptible; they do not demand constant attention and do not need to be fed very much; and I read plants are the ultimate indoor air cleaners.  They not only gobble up carbon dioxide that we exhale, they also take in other airborne chemical contaminants.  And, after stripping the CO 2 of the carbon, they exhale pure oxygen!  

But here is the thing. A good percentage of indoor plants die in the care of the well-meaning humans that harbor them.  And the biggest killer of all is OVER-WATERING!  And with it comes what annoys most folks - dripping water, staining and damaging of floor and table surfaces from excess water that goes over the drip pan.

The solution is in non-draining planters and avoid using a watering can because no matter how good we think we are at estimating we will almost always over water with it. I recommend using a measuring cup and stay with it, specially when using pots with drain holes.

For the best solution, use non-draining planters. Granted some plants may not take non-draining planters well, they are the exception.  First, do not throw away or put away into some dark cupboards or storage, any glass vases "gifted" with long stem roses, cut flowers for anniversary or Valentines, get well wishes, etc.  They are perfect non-draining planters because one can actually see how much water collects at the bottom.

Here is how to do it properly. Put a layer of 1-2 inches of small stones at the bottom before pouring the soil.  Once the plant is put in, measure the amount of water, one cup at a time, that ultimately settle at the bottom.  It should be just barely above the stones but touching the bottom of the soil.  Maintain that level, checking once weekly.  The soil will act like a wick, and water evaporates upwards anyway.  Meanwhile, as the plant continues to grow its roots will seek the water level downwards.  I've done all the experimentation so I know it works.  A glass planter is elegant and the small project makes it even more so.  Photos below show examples of non-draining plastic planters.


Last word: More and more people are spending time indoors as more retirees are living longer and their population is growing.  As winter comes around the corner even more people will spend more time indoors.  As for people who are actively outside their homes for most of the day to work or for other activities, it still remains a fact that we still spend a third of our lives sleeping at home including time spent watching TV, preparing and consuming meals, etc. While it is estimated that it would take a lot of plants to totally provide all our oxygen requirement if we are totally cut off from outside air, every single indoor plant will contribute in some small measure and increases considerably with every plant added. NASA research focuses on taking plants on future space travel as one meaningful way to provide astronauts with breathable oxygen recycled over and over throughout the duration of travel.  The featured "spider" plant (second from the top photos) is supposedly a species considered for space because of its efficient ability to recycle CO 2 to oxygen.


Sunday, September 11, 2016

The Work Bench

This may not be the ultimate work bench but it is my version of one. I have a small workshop so this work table was created from years of "it would be nice to have this or that capability" on a compact platform.  I have always thought that if the table saw is the heart of a woodworking system, the work bench would stand for a few anatomical metaphors: (a) it is the stomach where a lot of the cut pieces go to for further processing; (b) it is the liver and kidney where the work pieces get cleaned up (sanded/planed.scraped); (c) it is the brain where much contemplating, planning and mental processing get done; but what I truly want to add is (d) it should be a Hekatonheir or Centimanes in Greek mythology which stands for "a hundred hands".  In my case I just want a few extra hands. When using hand tools or hand-held power tools, the only safe way is to securely hold down the work piece.  Not much good comes out of holding the piece with one hand and using the other hand to work a hand tool, let alone with hand held power tools. 

I've had this work bench a while back but it was up against a wall. It was a butcher block purchased from a warehouse club and it was actually for, of all things, a butcher shop or bakery.  The top was laminated maple 1-3/4 inch thick. I constructed the legs from 4 X 4 fir.


Now I wanted it to be an extension to the table saw as the next photos will show,  But first I had to trim the legs by a quarter inch so the top will be level with the table saw top.  This would not have been an easy task (to make sure they'r cut accurately level) but fortunately a friend had loaned me his fancy but very capable saw to make the cut a breeze.


There is a marked difference between how Europeans construct the work bench from how it's done in the Americas. The European work bench has a center channel, like the one above.  The channel might take away a good chunk of surface area but it serves a purpose. It is a good temporary repository for some of the tools while not in use while clearing an area of flat surface for work pieces to be worked on. It is also a good place for chips, shavings, dust and other debris to fall into.  It is easier to clean up that area than if they're on the floor. From the two ideas I created a hybrid of sorts.


I created a channel by ripping from the middle, then made two sliding boards along rails (above and next photo). I have a channel but the center boards can be slid into position if a wider area is needed.  I installed T-tracks (blue strips shown) at strategic places. Along and across the table top they provide multiple points into which hold down clamps can be positioned.


Any workshop should have sufficient lighting but sometimes there is need for focused illumination on certain chores.  There is a commercial LED battery-powered (3 AA) portable table top lamp designed for the workshop that I thought was cleverly well thought out.  It has a goose neck, an adjustable beam, a robust base (battery housing and switch) with a very strong rare earth magnet at the bottom with optional 2-inch base plate, where a 3/4 inch dowel can be affixed with a screw. I constructed a wooden "shoe" with a 3/4 inch hole where the lamp's base can be inserted into and hold down bolt to fasten it anywhere along the T-tracks. It can also be anchored into the saw sled: next photos down).


The adjustable beam works very well.

 As shown the T-tracks provide enormous options  for holding down different accessories , surface options and functions (See next photos). And there is plenty of other optional items I have not thought of yet that can be added on, if only temporarily or one-at-a time, if a future need arises. 


Wednesday, August 17, 2016

Bedroom (Torsion box) Bench

My wife requested for this project with some requirements. It is quite obvious by now that the torsion box method of construction for making very light yet structurally rigid projects is my favorite, as earlier blogs on the subject indicate that very clearly.  This time though I would like to show more details and prove once more how a 60-inch long, 18 inch wide bench can be made so rigid and strong, yet so lightweight.  First key to this project is constructing the internal framework - an inner interlocking structure made with regular yellow or white pine soft wood.

                                    
The 2-inch wide pieces that make up the grid were constructed so precisely that no glue or any other fastener were needed to hold the parts in place. Not absolutely necessary to be effective but I want to demonstrate that a dial gauge caliper will allow precise cuts using the stacked dado blades on the table saw with trial cuts (shown above)  be first made to insure a good fit.  By the way, a dial gauge caliper that is more known as a machinist's tool is an invaluable woodworking tool such as in depth and height gauging, inside diameter measurements, etc.


Taking the time to set up the cutting order and use of stop blocks on the miter gauge pays off in a precisely accurate assembly of the grid.


A little tap with a mallet was all that was needed to put the grid together tightly and rigidly.


18 gauge pin nails and glue were used to fasten the side and end pieces, thus closing the "lattice".


To avoid sharp corners I made sure that it is done during the framing process.


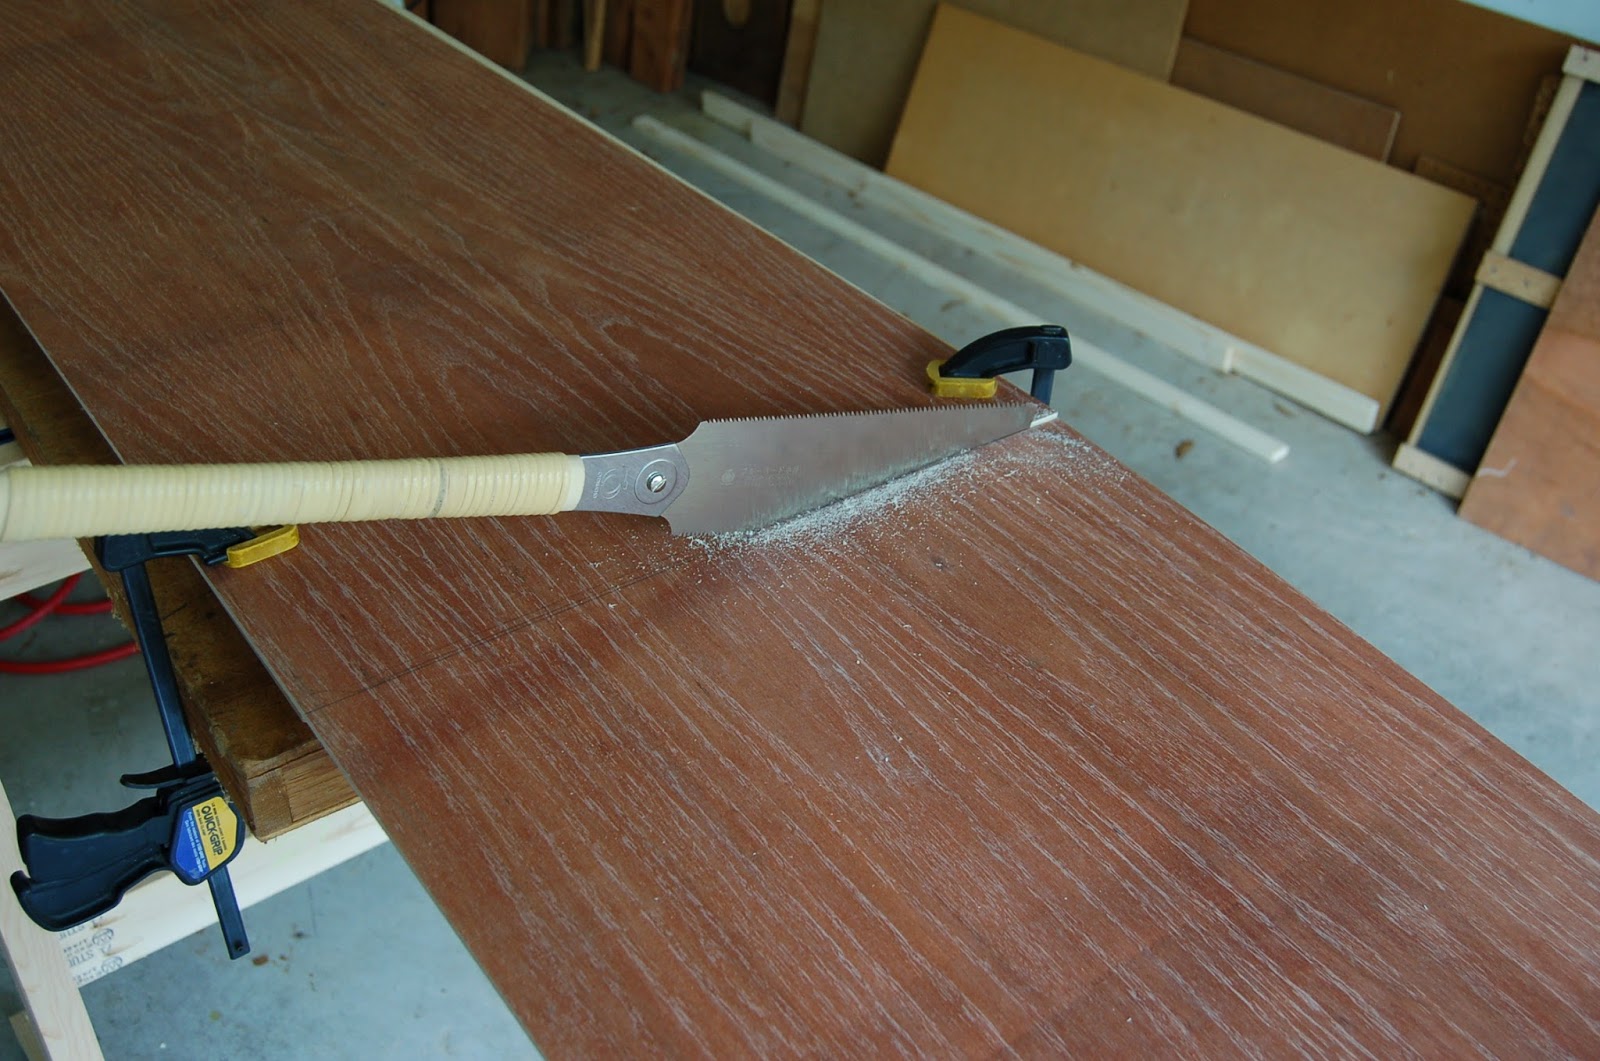
The 1/4 inch oak plywood skin is cut with a Japanese hand saw.  No need to be really precise with the cut at this point except to make sure it is slightly over-sized over the frame.  Edge routing will later trim it flush.


 The extra-thick blocks shown will be drilled for the large dowels that will connect the legs to the bottom of the bench. Make sure to mark the locations because drilling the holes will come after the plywood skin has covered the grid.


A little flattening and smoothing of the frames edges will insure good adhesion of the plywood skin when glued.


The side and end edges of the frame will be clad with 1/4 inch thick pieces of solid oak and walnut .


45-degree cuts will hide the seam between the oak and walnut.

23-gauge pin nails were used for the rest of the structure - fastening the plywood skin to the frame and the solid oak and walnut to hide the sides.  A good amount of glue was used each time before nailing them all together.

Here is another way to highlight the utility of the Krenov sawhorse.  Check past blog on the construction of this versatile sawhorse. 

The 23 gauge pin nails will barely show, especially once the project is finished.
 This finishes the bench seat.  Next step is to construct the pair of legs that will support it. 


A full size sketch of the leg is laid out on a board as shown below. 


I used lap joinery, which is simple but must be cut precisely. The full size drawing helped in laying out the parts and in cutting the joinery. A dial depth gauge (shown below) is another precision tool that takes away the guess work or trial and error when cutting the joinery on the table saw. 

I do not do this everyday so I'd use every precision marking tool (shown below) I have to make the cuts precisely.  It does save time and naturally saves material when you can do it right the first time, every time.

All the effort and time (going slow and making sure the markings are precise) makes assembly a breeze.


Using 5/8 inch dowels as "anchor bolts" to fasten the legs to the top will require precision drilling of the holes on both sides - on top of the leg's rail and bottom of the bench seat. A great solution is to make a jig where I drilled three holes.  These properly spaced holes will serve as guides to locate the holes on the leg and the bench accurately.  The "channel" on the jig with the help of a clamp eliminates movement that insures accurate location during the drilling process. 


The same jig is then used to drill the holes on the bench.

One requirement from my wife is that even her can easily move this bench effortlessly, hence the minimal use of material without compromising strength.  The bench top dimension is 60 X 18 inches.

The dowel pins are glued first to the legs.  Once dry and fully fixed, all three may not go in completely or are going to be very tight, so a slight sanding of one or two of them will insure a snug fit. (make sure not to force them in; so a little patience in fine tuning the fit will do the job).

Sufficient amount of glue and 3-1/2 inch wood screws and making sure they are perfectly perpendicular (90 deg) to the bottom will completely fasten the legs.


One coat of stain and three coats of rub-on polyurethane were applied.

Note an earlier 48-inch bench in the background.  This 60-inch bench (or 1.523 meters to my European readers) tipped the weighing scale at a mere 17 pounds (or just 7.7 kilos); it is lighter than most carry-on luggage.  One may carry this literally tucked in between one arm and one side.

The bench will seat two-three people


Now for an explanation as to why the legs were configured this way. First, the back edge needed to be flush to the bed mattress.  The bed's platform would have been in the way. Second, my wife also wanted to round off the corner of the platform.  I cannot just cut the corners off because the platform was also constructed as a torsion box (check my earlier blog on its construction) so the inner skeleton will be compromised. So, the next project will deal with that and it is likely that the best solution is to extend the width by about two inches, hence the allowance for a seemingly wide gap.