I needed an additional platform to contain a monitor and video recorder for the home security camera. It will be in a nearly crowded corner of the library where my wife's desktop computer and printer are located. This called for a floating shelf attached to the two adjacent walls (corner) requiring no support bracket. The torsion box construction (which had been discussed in past blogs) is the natural lightweight but rigid structure. Introduced here a new after market tool (fixture) designed for the table saw (yellow item, 3rd photo below) that makes cutting the dadoes for the skeletal frame without marking and measuring (believe it or not).
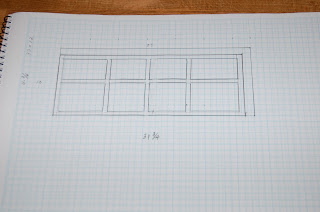
A rough sketch of the skeleton structure of the shelf helps to locate the cross joinery.
1- inch work pieces were ripped on the table saw. The fixture in yellow allows for perfectly accurate indexing of the dadoes. I can still cut those dadoes by marking the pieces one by one but this inexpensive indexing tool makes the cut uniformly, accurately, and rapidly. See next three photos.
The cross pieces fastened by clamps and glue (no nails or screws needed)
The joinery of the cross members are tight and consistently accurate.
The torsion box is defined by the skeleton and a cladding of thin 1/4 inch plywood. Tip: a cross cut sled makes cutting the wide pieces safely and accurately (next two photos below).
Liberal amount of glue was applied to the skeleton as shown below.
A pneumatic pin nailer does a great job of keeping the plywood skin tightly in place until the glue dries.
The floating shelf relies on an anchor in the form of two pieces in the L-configuration attached very securely to the wall. The shelf has two channels that will allow the shelf to slide into them.
Two adjacent sides of the shelf have 1-1/4 inch channels that will slide into the support brackets (next three photos below).
The brackets are fastened with long screws into the studs behind the drywall. It is critical that the brackets are attached that way.
I drilled the holes for the cables and power cords to go through from the cameras and router to the recorder and monitor.
A special attachment to the drill (shown below) makes it easy to drive screws without the drill chuck hitting the wall. This attachment is solely for this purpose (an impossible task if one must drive the screws at 90 deg vertical right next to a wall). This is one of those accessories that seldom get used but very critical when the work calls for it. (One option is to just nail it down and glued - making the shelf permanently installed - only a major renovation will move it)
Additional Tips for laying out the camera cables.
(1) Use a glue gun to secure the wires to both bricks, concrete or dry wall. It is a lot neater without the unsightly staples, nails or screws.
The shop made wooden "grommets" (rectangles as shown will be painted later)
The cable here is visible but it is in the laundry area (no space in the attic area to comfortably lay it out from there). Nevertheless, a glue gun keeps it neat and secured.


No comments:
Post a Comment