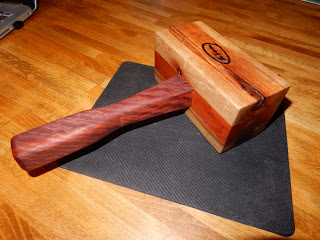
Over the years I've made several mallets, four exactly, before this fifth one. All previous four were made with handles permanently fixed to the mallet head with glue and wedges. What is different with the fifth one?
Photo below shows a detachable handle! You can remove it and re-attach it all within five seconds and use it like any permanently handled mallet. Hard to believe when I saw it constructed by Jay Bates (You Tube woodworking - check him out). The only definitive way to find out was to make one and see if it works as shown in Bate's presentation. It does. Perfectly, in fact.
What is the advantage of a removable handle? With just one handle one may make several mallet heads of different weights (depending on wood species), heft or bulk, hardness and softness. Without having to occupy too much space in the workshop one can have different mallets for specific applications. More importantly, since only the mallet heads will be subjected to wear and tear, bruising or denting, making new ones will be easier than making an entire mallet each time. And I can use one mallet head at the kitchen and another at the workshop, using just one handle - which is the key to a good mallet but it is harder to fashion. So, a mallet with a detachable handle.
An actual scale drawing is invaluable.
I tapered a 1/2 inch plywood which will become the pattern for the actual work piece
(Photo below): Cutting to rough dimension a piece of Eucalyptus - a very dense hardwood of a reddish color almost matching the red soil of its Australian habitat. A good time to practice cutting with my new shop-made saw (previous blog). Or, maybe not. Eucalyptus is indeed a very hard wood to work with.
Double sided tape joins the pattern and work piece.
A handful of hand tools to fashion the handle
The mallet head is made of four pieces glued together. Two side pieces (Pecan) are glued to the two center pieces (Red Cherry) cut to the exact dimensions as shown in the drawing above. This creates a mortised "socket" perfectly matched to the handle end that will be the tenon.
Note that all four of the first versions I made had relatively longer handles. I realized that when I used them I often "choke" the handle closest to the mallet head because I realized I had better control holding it that way. Sure enough, the closer one holds the handle part closest to the mallet head achieves better control when striking.
Photo below was the first one I made. I call it the "enforcer" because its long handle and heavy weighted head makes it ideal for heavy strikes.
I think I will favor the short handled one for most jobs. By the way, one tap from the handle end on any hard surface tightens the joint between handle and mallet head; one tap on the mallet head end loosens the joint. It is all friction but the key is in the construction. Maximum contact area is critical so the mortised socket and handle flare must match perfectly.
Now, I find a mallet quite handy (literally) at the kitchen for a variety of purpose, i.e. smashing garlic, nuts, crab claws, to closing the lid on cans, etc. Below, I typically love to cut fish tails and fins with it and making precise steak cuts by first making straight cuts on one side of the fish and striking the back of the cleaver with the mallet for very precise cuts.
With the easing of the Covid 19 lock down we together with two other couples decided to have a potluck lunch at one of the couple's home. This was what I brought.
For hundreds of years in Asia people would broil fish wrapped in banana leaves over charcoal. This keeps the stuffing and spices in place and enclosed during the entire cooking. The cooked fish will remain moist and full of flavor.
In my case, after the traditional preparation, it was easier to bake it at 400 F deg (or 204 Celsius for my European readers) for 40 minutes. Tender and moist fish is cooked well all the time.
For dessert, I prepared sweet yam this way.
I learned from my wife's sister-in-law that by first putting the yam in hot oil for about 1-2 minutes, and remove them into a pan with brown sugar in it and shaken (with the lid on), insures that the cut pieces of yam will be fully smothered with the sugar. The hot oil on the yam makes the sugar cling more effectively and will in fact remain on the pieces when put back into the hot oil to complete the cooking.
Afterwards, I use coffee filter to strain the used oil for reuse - once or twice before completely discarding it. I mark the container to make sure the oil is used for the same purpose. In this case, the next time I do this kind f cooking for yam or plantain bananas or potato.


No comments:
Post a Comment