Welcome to Woodworks Made Easy

Practice any art, however well or badly, not to get money and fame, but to find out what's inside you.
--- Kurt Vonnegut

Pictures are meant to be self explanatory, and for visual clarity you may
click on each photo to enlarge. For older projects see Blog Archive. I don't specialize on a particular genre so there is quite a variety of projects for a number of different interests.

Even if you are not a woodworker but you like some or all of the projects, have your local crafts person make them for you from the ideas and photos you see here. For a particular project just click the specific title on the Blog Archive list (right side column below).

For anyone willing to learn or begin to do woodworking for the first time, please read first from the Blog Archive, "How and Where to Begin a Woodworking Hobby.

And it is not for men only. Read my note on "Women in Woodworking" from Blog Archive, April 2010.


click on each photo to enlarge


Monday, June 1, 2020

Shop to Kitchen to Shop Mallet

Over the years I've made several mallets, four exactly, before this  fifth one.  All previous four were made with handles permanently fixed to the mallet head with glue and wedges.  What is different with the fifth one?


Photo below shows a detachable handle!  You can remove it and re-attach it all within five seconds and use it like any permanently handled mallet.  Hard to believe when I saw it constructed by Jay Bates (You Tube woodworking - check him out). The only definitive way to find out was to make one and see if it works as shown in Bate's presentation. It does.  Perfectly, in fact.

What is the advantage of a removable handle? With just one handle one may make several mallet heads of different weights (depending on wood species), heft or bulk, hardness and softness.  Without having to occupy too much space in the workshop one can have different  mallets for specific applications.  More importantly, since only the mallet heads will be subjected to wear and tear, bruising or denting, making new ones will be easier than making an entire mallet each time.  And I can use one mallet head at the kitchen and another at the workshop, using just one handle - which is the key to a good mallet but it is harder to fashion.  So, a mallet with a detachable handle.


An actual scale drawing is invaluable.


I tapered a 1/2 inch plywood which will become the pattern for the actual work piece


(Photo below): Cutting to rough dimension a piece of Eucalyptus - a very dense hardwood of a reddish color almost matching the red soil of its Australian habitat.  A good time to practice cutting with my new shop-made saw (previous blog).  Or, maybe not. Eucalyptus is indeed a very hard wood to work with.


Double sided tape joins the pattern and work piece.


Router with pattern-making bit  makes an exact copy of pattern to work piece.


A handful of hand tools to fashion the handle


The mallet head is made of four pieces glued together.  Two side pieces (Pecan) are glued to the two center pieces (Red Cherry) cut to the exact dimensions as shown in the drawing above.  This creates a mortised "socket"  perfectly matched to the handle end that will be the tenon.


Note that all four of the first versions I made had relatively longer handles.  I realized that when I used them I often "choke" the handle closest to the mallet head because I realized I had better control holding it that way.  Sure enough, the closer one holds the handle part closest to the mallet head achieves better control when striking.


Photo below was the first one I made.  I call it the "enforcer" because its long handle and heavy weighted head makes it ideal for heavy strikes.


I think I will favor the short handled one for most jobs. By the way, one tap from the handle end on any hard surface tightens the joint between handle and mallet head; one tap on the mallet head end loosens the joint.  It is all friction but the key is in the construction.  Maximum contact area is critical so the mortised socket and handle flare must match perfectly.


Now, I find a mallet quite handy (literally) at the kitchen for a variety of purpose, i.e. smashing garlic, nuts, crab claws, to closing the lid on cans, etc.  Below, I typically love to cut fish tails and fins with it and making precise steak cuts by first making straight cuts on one side of the fish and striking the back of the cleaver with the mallet for very precise cuts.

With the easing of the Covid 19 lock down we together with two other couples decided to have a potluck lunch at one of the couple's home. This was what I brought.


For hundreds of years in Asia people would broil fish wrapped in banana leaves over charcoal.  This keeps the stuffing and spices in place and enclosed during the entire cooking.  The cooked fish will remain moist and full of flavor.


In my case, after the traditional preparation, it was easier to bake it at 400 F deg (or 204 Celsius for my European readers) for 40 minutes. Tender and moist fish is cooked well all the time.


For dessert, I prepared sweet yam this way.


I learned from my wife's sister-in-law that by first putting the yam in hot oil for about 1-2 minutes, and remove them into a pan with brown sugar in it and shaken (with the lid on), insures that the cut pieces of yam will be fully smothered with the sugar.  The hot oil on the yam makes the sugar cling more effectively and will in fact remain on the pieces when put back into the hot oil to complete the cooking. 


Afterwards, I use coffee filter to strain the used oil for  reuse - once or twice before completely discarding it.  I mark the container to make sure the oil is used for the same purpose.  In this case, the next time I do this kind f cooking for yam or plantain bananas or potato.


Friday, May 22, 2020

Old World Tool, New World Version


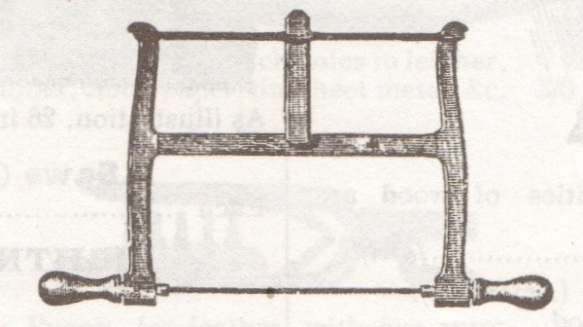
There is no good reference record as to  exactly when or where this type of saw was recorded to have been used for the first time.  Apparently, Roman carpenters may have first begun fashioning saws with thin blades on bowed frames to make curve cuts.  It is also known by different names. It's a bow saw (for  one obvious reason), a turning saw or a curving saw.  It is known under the umbrella of frame saws.  A bow saw is likely the one made with a metal frame known to have started in Sweden, where the term "bow" associated with saws was first used and during that time folks from outside that country simply called them  "Swede saws"  in the  early 1900s.  It was a high tech tool of its time.

First two photos below are traditional designs made from solid hard wood frames. I wanted to make one although I prefer straight lines mostly for my projects.  I seldom use curved shapes which is why I do not own a band saw (aside from the fact that I really don't have any more space to put one in my small workshop).  Most of the curve cuts I do are with a power jig saw or bench top scroll saw and a manual coping saw for thin work pieces.  So, why make one? An old world tool at that? It was a challenge and a creative outlet in the midst of the Corona virus lock down.


1907Tools-frame saw


I wanted to improve on the design with a different construction method and look. 

Parts of a fully assembled saw are labeled below.  The saw can be disassembled into all its basic parts and re-assembled in very little time.


First, I cut strips of 1/2 inch Baltic plywood.


I ripped and sliced pieces of Padauk to 1/4 inch thickness.  Padauk is  a dense and heavy hardwood native to Southeast Asia and distinctly reddish in color.  The Philippine Padauk is known as Narra, which is the country's national tree. A while back I had purchased a 1 X 4 X 48 inch board, among several other pieces of hardwood from a supplier that was going out of business.  Even at a close-out sale it was still quite pricey so I waited and waited for the right project.  Until now.


A solid Padauk would be quite heavy for a hand tool the size of this saw. Laminating it over a very stable but lighter Baltic plywood not only makes the overall weight lighter, it will be much more rigid where the goal was to get maximum resistance to bending such as cast metal would.


Speaking of hand tools, I recently added for the first time a Japanese hand plane (left, photo below next to the western one which I made a while back ).  Like the Japanese saw, which is what I use exclusively, this operates on the pull (starting away from and towards the user's body with a pulling action). It was not that difficult to get used to and it does seem a tad easier to control.

Photo below does show how the laminated work pieces look.


Below, marking the mortises, later cut with drill and chisel, for the ends of the stretcher to fit into.


For good measure I created a 1/4 inch groove on both arms where I glued 1/4/ X 1/4 solid walnut to reinforce the entire length.


The handle and the toe were  from one laminated piece - this time using a 3/4 inch plywood clad with the Padauk.


As you can tell I need to practice for a bit longer to achieve more accurate and smoother cuts (below).


I have an interesting footnote story on the Padauk.  As mentioned earlier, it is known in the Philippines as Narra.  Species vary from region to region in the Far East in redness.  The one I used here is likely from the region in or around Myanmar - which is intensely red, other species could be much darker red or lighter with streaks of whitish yellow or brown.


Many years ago while working in the Philippines, my family and I moved to the southern island of Mindanao and lived in the city of Davao, for a one-year stint.  Our second son was born there. Just outside the city was a national penitentiary. Inmates there had options to work on trade crafts to make use of their time (many with very long prison sentences). One of those trade crafts was woodworking. The finished products were sold to the public at a store outside. One day my wife and I went and bought two pieces of pedestal corner tables.  Years after that we immigrated to the U.S. We did sell a lot of our household stuff but the few that remained, which included the two tables, stayed at my in-laws home .  Years later on one of our visits back to the Philippines I decided to have the two pieces dis-assembled and brought them back with our luggage.  Fast forward to another two decades and here they are, still in their dis-assembled state, but in good shape despite the garage environment where they sat and sat.  

After this saw project, I remembered the pieces and realized they were made out of Narra (Padauk).  The larger piece is a 21 inch diameter solid (not from joined pieces) wood.


Carving solid pieces of hardwood must have taken a long time.  The inmates may not have had the sophisticated modern tools but time - they had copious amounts of it.

The bottom side clearly shows they were solid pieces (not glued boards), so we can only imagine how huge the tree that they came from.

The Padauk piece I bought against the old table.

The pedestals though dissimilar in design were also from solid pieces


I now aim to make this a project very soon.  We bought these in 1977.  It's about time I do something about it.  Of course, back then I had no idea I will take up woodworking as a hobby when we came here.  Now, I realized too that the inmates, while very skilled, did not have access to really good tools and fastening material, including quality glue and screws. So they used nails to fasten everything.  

I need to preserve these pieces now that I just learned that the huge Padauk trees that grew to as much as 7 feet  in girth are rare.  Narra  is not quite in the endangered list but it is under the category of vulnerable. 


Sunday, May 3, 2020

Torch Holder

Let me ask the reader this.  Right now, do you know right away where your handy, little flash light is when you need it?  Or, what my UK and British Commonwealth readers call, "torch". To digress, the flashlight is what most folks in the U.S. call it and in other countries where American influence is strongest. I must admit, torch is probably closer to describing what the flashlight does if we go by utility.  I'll avoid any argument by quoting below: 

"As the word for a photographer's light-emitting preparation, 1892 ( flash-lamp in this sense is by 1890). From 1905 as as a handheld, pocket-sized electric illumination device, the American English word for what the British might call an electric torch".

Back to why we're here talking about the "torch" holder.  Decades before 1890 this whole conversation would have been about candle holders.  We're in the 21st century.  Electrification is wide spread.  Our households (in developed and developing countries) rely on instantaneous night lighting at the flick of a switch.  However, inevitably and as to be expected, power failure does occur from time to time, rarely or often, depending on where you are.  There are places in some parts of the world where black outs or the more common rolling brown outs are a way of life.

Anyhow, when it does happen, are you going to be fumbling your way around when the lights go out and you can't remember where you last put your handy little flashlight or your reliable torch?  Was it in a drawer by the kitchen?  Or, do you have it by your bedside?  As often, power failure occurs while you are having dinner, watching TV or during moments you least expect it, of course, and suddenly the whole house is pitch black and you can't remember where you last saw or used the now not-so-handy portable light source.  And then you find it but the battery is all drained of its energy to be useful.

TIP: Keep one at the same place that you will easily remember. And return it there after each use.  Soon your brain will get so used to where it is, you can get to it blind folded. An exaggeration,  but it must come to that to avoid what we all dread - manage your way around when you're in the dark.

Ideas vary.  I've seen folks put their standby torch in a glass jar or coffee mug on the kitchen counter table or desk or any place they'll always remember.


I made a little stand a while back that my wife now has on her desk in the library


What I find personally helpful is a quick access to a flashlight or even a penlight and then perhaps at a later moment get to my more robust light source like the one shown below (next photo) 


Now, since my wife took my little handy flashlight, I bought a new one that is a little bit bigger for which a woodworking project inevitably became another reason to, what else...


Make use of some scrap wood and although some of you may see this as overkill, I hope more of you will find inspiration to create their own own version.


As discussed earlier, a coffee mug will work just as well but hey, this was more fun to do.


A flashlight holder in the following photos below allow for an immediate practical use. The  up-light's indirect glow create a wide swath of light for one to move about, hands free.


The key naturally is that next to finding your flash light is for it to be working.  Keeping it in view at all times gives you constant opportunity to check it from time to time, which is unlikely for anyone to do if it is hidden in drawers or just simply out of sight.  Remember, "Out of sight, out of mind".

I hope this was a good tip.